Dreaming of transforming your patio into a stylish, all-weather oasis? The thought of installing outdoor blinds can be exciting, but it often comes with a dose of doubt. You might be wondering if you have the skills, what tools you’ll need, or you might have that nagging fear of measuring incorrectly and ending up with a costly mistake. We get it. That’s why we’ve put together this guide to show you just how achievable a DIY installation of premium zipscreen blinds really is.
Consider this your go-to manual for a flawless finish. We’ll walk you through everything-from taking perfect measurements the first time to gathering the right gear for the job. You’ll gain the confidence to tackle this project head-on, save a significant amount on installation fees, and create that seamless, weatherproof outdoor living area you’ve always wanted. Let’s get started.
Key Takeaways
- Installing your own outdoor blinds is a completely achievable DIY project for the average Aussie homeowner.
- Mastering the ‘measure three times, order once’ rule is the secret to a perfect, gap-free fit for your new blinds.
- You probably already have most of the essential tools needed for a smooth, professional-looking installation.
- Understanding the simple, track-guided technology is the first step to transforming your patio with premium zipscreen blinds.
What Are Zipscreen Blinds and Why Are They a Game-Changer for Aussie Patios?
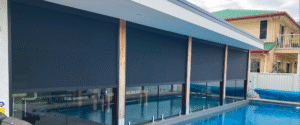
If you’ve ever wished you could get more use out of your Brisbane patio, you’re not alone. The harsh sun, sudden downpours, and pesky insects can often send us running back inside. That’s where zipscreen blinds come in. Think of them as the next evolution of the outdoor blind. Unlike a traditional window blind or a simple straight-drop awning that can flap and bang in the wind, a Zipscreen is a premium, track-guided system.
The real magic is in its patented z-LOCK™ technology-a clever zip welded to the fabric edges that runs smoothly inside concealed side channels. This simple but brilliant design creates a fully sealed, taut, and incredibly durable barrier between you and the elements. It effectively transforms your alfresco area from a part-time space into a year-round outdoor room, making it a true game-changer for the Australian lifestyle.
Total Weather Protection
With a Zipscreen system, you’re in complete control. The robust fabric blocks harsh UV rays, cuts down on annoying glare, and can significantly reduce heat, making your patio comfortable even on a scorching summer afternoon. When a southerly blows through or a storm rolls in, the locked-in fabric provides a sturdy shield against wind and rain, so you can keep enjoying your outdoor space no matter what the forecast says.
Complete Insect Control
Say goodbye to the great Aussie salute! The fully enclosed design of zipscreen blinds means there are no gaps for flies, mosquitoes, and other creepy crawlies to sneak through. This creates a genuinely bug-free outdoor sanctuary. You can finally enjoy a peaceful dinner or entertain guests without uninvited pests buzzing around your food and family. It’s the perfect solution for creating a safe and comfortable zone for kids and pets to play in.
Uninterrupted Views and Privacy
Enclosing your patio doesn’t mean you have to feel boxed in. Zipscreen offers a wide range of modern mesh fabrics that provide excellent privacy from neighbours while still preserving your view. You maintain that beautiful sense of openness and connection to your garden. Best of all, because the fabric is held taut in the side channels, you’ll never have to deal with the noisy rattling and flapping that comes with older, unsecured blinds.
The Big Question: Can You Really Install Zipscreen Blinds Yourself?
Let’s get straight to it. Can the average Brisbane homeowner really install their own zipscreen blinds? The answer is a confident ‘Yes, absolutely!’ We’ve designed our entire system to empower you to get a professional finish without the professional price tag. Think of it less as a daunting construction job and more as a rewarding weekend project that adds serious value and comfort to your outdoor living space. With our custom-made kits and clear instructions, you’ll be amazed at what you can achieve.
Who is DIY Installation For?
This project is perfect for anyone with a bit of DIY confidence. If you’ve ever put together flat-pack furniture or hung a picture frame straight, you’ve got the skills you need. All it really takes is a drill, a spirit level, and a bit of care. For the larger blinds, we do recommend grabbing a mate to help with the lifting and positioning-it makes the job quicker, safer, and a lot more fun.
The Cost-Saving Advantage of DIY
Here’s the best part: the savings. Professional installation can add a significant 30-50% to the total cost of your blinds. By doing it yourself, you keep that money right in your pocket. You could use those savings to upgrade to a motorised system for ultimate convenience, or simply enjoy getting a premium, Australian-made product at a factory-direct price. Plus, these blinds offer ongoing savings. High-quality external screens are proven to reduce solar heat gain, which can help lower your cooling bills during those hot Brisbane summers.
What We Provide to Make it Easy
We don’t just send you a box and wish you luck. We set you up for success from the start. Your zipscreen blinds arrive custom-made to your exact measurements, ensuring a perfect fit. Inside the box, you’ll find every single component you need-from the high-quality brackets and side channels to the last screw. And to guide you through it, we have clear, step-by-step instructions available online.
Curious to see what’s involved? Download our Zipscreen Installation Guide to see just how simple it is.
Measuring for Zipscreen Blinds: The Most Critical DIY Step
Alright, let’s get down to brass tacks. If there’s one step in your Brisbane DIY project you can’t afford to rush, it’s this one. A perfect fit is what separates a professional-looking installation from a frustrating one. We live by the classic Aussie motto: ‘measure three times, order once.’ Getting your measurements spot-on ensures your custom-made zipscreen blinds will operate smoothly, look brilliant, and provide maximum protection from the elements.
Face Fit vs. Recess (or Channel) Fit
First, you’ll need to decide how your blinds will be mounted. There are two main options, and choosing the right one depends on your space.
- Face Fit: This is the most common and forgiving method. The blind is mounted on the face of the wall or posts, overlapping the opening. It’s the perfect choice if your opening isn’t perfectly square.
- Recess Fit: For a sleek, built-in look, the blind is mounted inside the opening, sitting flush between your posts or walls. This requires a very square and level opening, so precision is key.
How to Measure Width Accurately
Once you’ve chosen your fit type, grab a reliable steel tape measure. To get the width right, measure the opening at the top, middle, and bottom. It’s common for outdoor spaces to have slight variations, so don’t be surprised if the numbers are different. Always use the smallest of the three measurements for your final order. This guarantees the blind’s side channels will fit without any issues. A snug fit is crucial as it maximises shade and privacy, and a study from the Illinois Institute of Technology even found that well-fitted automated shades can lead to significant energy savings.
How to Measure the Drop (Height)
Measuring the drop, or height, follows the exact same principle. Measure the height of the opening on the left side, in the middle, and on the right side. Just like with the width, you should use the smallest of the three measurements. This ensures the bottom bar of the blind can close fully without scraping or getting caught on an uneven patio or deck. Before you even think about clicking ‘order’, check every number one last time. A mate’s second pair of eyes never hurts, either!
Feeling confident? Fantastic! But if you’re still a bit unsure or just want to see some diagrams, we’ve got you covered. View our detailed measurement guide here for step-by-step visuals.
Your Essential Toolkit for Zipscreen Installation
Good news! You won’t need to raid the local Bunnings for a truckload of specialised gear to install your new zipscreen blinds. Most of what you need for a smooth, professional-looking installation is probably already sitting in your Brisbane garage or shed. Getting your tools organised before you start is the key to a stress-free DIY project and a fantastic result you can be proud of.
Must-Have Tools
Before you unbox your beautiful new outdoor blinds, do a quick stocktake to make sure you have these essentials on hand. They’re the non-negotiables for getting the job done right the first time.
- A quality cordless drill: An absolute must for fixing brackets. Make sure it’s fully charged and you have a set of assorted drill bits to suit the surface you’re mounting to (brick, timber, or metal).
- A sturdy step ladder: Or two, if you’re working with a wide space. Safety and stability are key, so make sure your ladder is on solid, level ground before you climb.
- A spirit level: This is your best mate for ensuring your blinds hang perfectly straight. A wonky blind is a dead giveaway of a rushed job! A laser level is a great upgrade if you have one.
- A good quality tape measure: You’ve already used it to order, but you’ll need it again for double-checking measurements and marking out your drill holes with precision.
Other Helpful Items
These bits and pieces aren’t strictly essential, but trust us, they’ll make the installation process a whole lot easier and give you a more polished, long-lasting result.
- Pencil or marker: For clearly marking where your brackets and drill holes will go. Simple, but crucial for accuracy.
- Caulking gun with silicone sealant: To create a weatherproof seal around your brackets and channels, protecting your installation from the Brisbane elements.
- A friend: An extra pair of hands is invaluable, especially when it’s time to lift the headbox into place. It’s safer and makes the whole job quicker, so grab a mate!
Safety First: Preparation
A successful DIY job is a safe one. At Aussie Online Blinds, we’re all about empowering you, but that starts with looking after yourself. Before you even pick up a drill, take a few moments to prepare your workspace and yourself. It’s a small step that makes a big difference.
- Wear safety glasses: This is non-negotiable, especially when drilling overhead. Protect your eyes from dust and debris.
- Clear your work area: Remove any furniture, pot plants, or tripping hazards from the installation area.
- Check your ladder: Ensure it’s stable, on level ground, and fully extended before you put any weight on it.
With this toolkit assembled, you’re well on your way to transforming your outdoor area with stunning new zipscreen blinds.
The Installation Process: A Step-by-Step Overview
Alright, let’s get down to the brass tacks. Installing your own zipscreen blinds might seem like a big job, but we’ve designed our systems for a straightforward DIY setup. Think of this as a friendly overview to show you what’s involved and build your confidence. It’s not a replacement for the detailed instructions that come with your order, but it’ll prove that with a bit of care and the right tools, you’ve absolutely got this.
We’ve broken the process down into three manageable stages. Take your time with each one, and you’ll be enjoying your new Brisbane outdoor space in no time.
Step 1: Unboxing and Pre-Installation Checks
The first step is all about preparation. Carefully unpack all the components and lay them out on a clean, protected surface like a drop sheet or some cardboard. Cross-check everything against your order to make sure it’s all there. Before you pick up a single tool, hold the headbox and side channels in place. This simple visualisation helps you confirm the fit and get a real feel for how your new blind will transform the area.
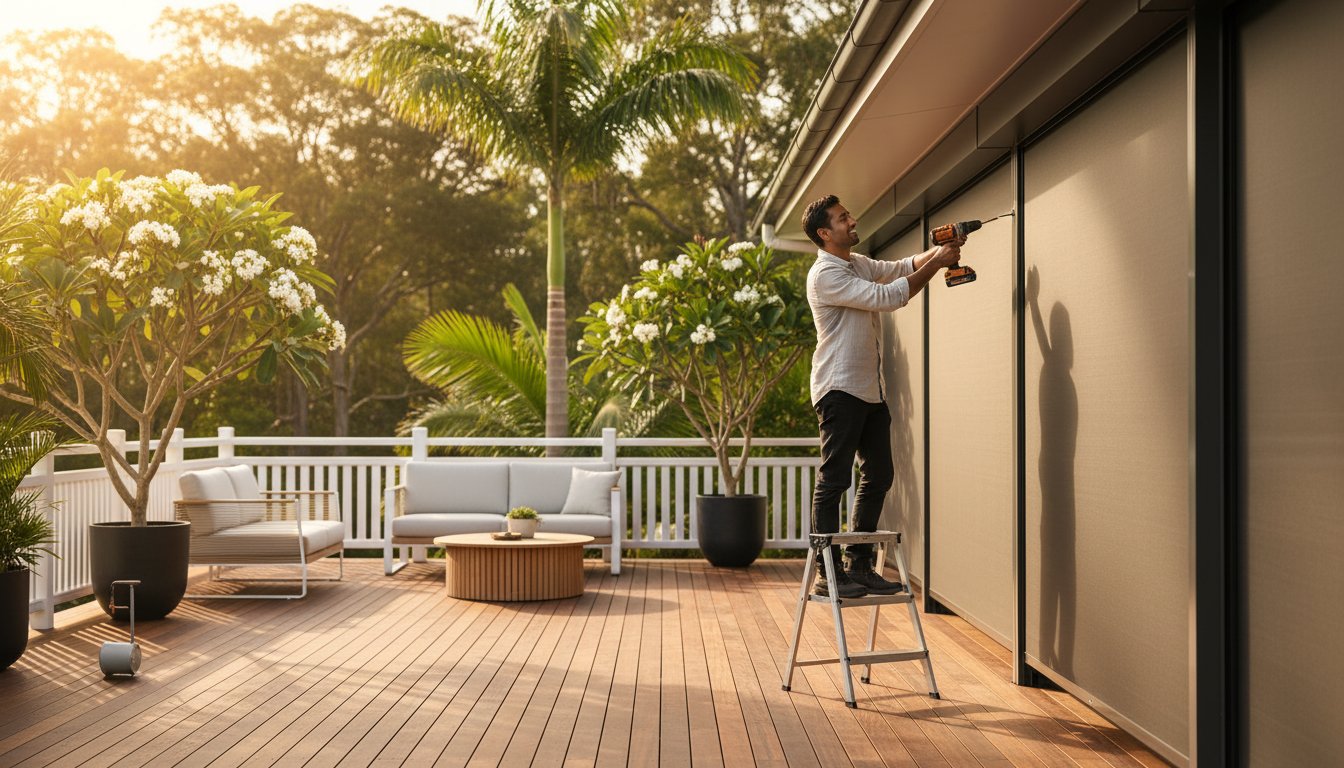
Step 2: Mounting the Brackets and Side Channels
This is where your project starts taking shape. Using your tape measure, carefully mark the positions for your headbox brackets according to the guide. The old saying “measure twice, drill once” definitely applies here! Once you’re happy with your marks, drill the pilot holes and securely fix the brackets in place. Next, attach the side channels. The most crucial part of this step is ensuring they are perfectly vertical-use a spirit level to get them plumb. This guarantees a smooth glide for your blind.
Step 3: Installing the Blind and Final Adjustments
Now for the most satisfying part! Grab a mate for this step, as lifting the headbox is much easier and safer with two people. Carefully lift the headbox and click it securely into the brackets you just installed-you’ll hear and feel it lock in. Gently guide the zips on the edge of the fabric into the side channels. Finally, test the operation. Whether motorised or manual, your blind should move up and down smoothly. Make any minor adjustments as needed, and that’s it. You’ve done it!
Feeling confident and ready to start your project? Customise your Zipscreen Blinds now!
You’ve Got This: It’s Time to Upgrade Your Outdoors
And there you have it-a complete roadmap to installing your very own outdoor blinds. As you’ve seen, this isn’t a job reserved for the pros. With careful measuring and our step-by-step guide, you’re more than equipped to achieve a flawless, professional finish. The best part? You’ll save up to 50% by doing it yourself, transforming your patio or pergola without breaking the bank.
The confidence and savings from a successful DIY project can inspire other lifestyle upgrades, especially ones that help you enjoy the great outdoors. With the money you’ve saved, you could treat yourself to a day on the water with a service like Boat4Hire if you’re ever in the Melbourne area.
Now it’s time to take the next step. Our premium zipscreen blinds are proudly Australian Made to withstand our unique conditions and are backed by a solid 3-year product warranty. You’ve done the research, now it’s time for the reward: a beautiful, functional outdoor space you can enjoy all year round. Go on, you’ve earned it!
Ready to transform your outdoor area? Design and price your custom Zipscreen Blinds today!
Frequently Asked Questions
How long does a typical DIY Zipscreen installation take?
Good news for the handy homeowner! A standard DIY Zipscreen installation is surprisingly straightforward. For a single blind, you can expect the job to take between 1 to 2 hours, assuming you have your tools ready. Of course, this can vary a bit depending on your confidence with a drill and the specifics of your space. We provide simple, step-by-step instructions to guide you, making the whole process a breeze from start to finish.
What happens if I measure my space incorrectly?
We can’t stress this enough: getting your measurements right is the most crucial step. Because every blind is custom-made right here in Australia to your exact specs, we can’t offer returns or refunds for incorrect measurements. We strongly recommend following our detailed measuring guides to the letter and double-checking everything before you order. A little care here ensures a perfect, seamless fit for your beautiful new outdoor blinds.
Are Zipscreen blinds difficult to clean and maintain?
Not at all! Keeping your Zipscreen blinds looking schmick is incredibly easy. A simple wash-down with a soft cloth or brush and some mild, soapy water is all it takes to remove dust and grime. The high-quality, durable fabrics and components are designed to withstand the tough Brisbane climate, so you can spend less time cleaning and more time enjoying your fantastic outdoor space. It’s low-maintenance living at its best.
What is the difference between Zipscreen and Ziptrak blinds?
That’s a great question, as they’re both top-tier Aussie brands for track-guided systems. The core concept is the same: a fabric screen held taut within side channels. The main differences lie in patented components, such as the zip mechanism and bottom bar design. Both offer fantastic protection from sun, wind, and insects. We stand by the premium quality and engineering of the Zipscreen system for its reliability and sleek, modern finish.
Can I motorise my Zipscreen blinds with a DIY installation?
Absolutely! Bringing modern convenience to your patio is well within reach for a DIYer. We offer premium motorisation options that are designed for straightforward installation. While battery-powered motors are a simple plug-and-play solution, any hardwired motors will require a licensed electrician to connect to your mains power, as per Australian standards. Imagine controlling your outdoor comfort with the simple touch of a button – it’s a brilliant upgrade.
How much wind can Zipscreen blinds actually handle?
Built tough for Aussie conditions, Zipscreen blinds are engineered to handle some serious wind. Depending on the size, they are typically rated for winds up to 50-60 km/h. The patented z-LOCK™ technology ensures the fabric is held securely in the tracks, preventing blowouts and flapping. However, as a common-sense precaution, we always recommend retracting your blinds during severe storms or cyclonic winds to protect your investment for years to come.
What fabric options are best for blocking out the sun vs. maintaining a view?
We’ve got you covered for any situation. For maximum sun and heat protection while keeping your view, choose a mesh or sunscreen fabric. A fabric with 5% openness is a popular choice, offering excellent UV protection and daytime privacy without sacrificing your outlook. If you’re after complete privacy or want to create a dark, cinema-like space, a full blockout acrylic fabric is the perfect solution, completely stopping both light and vision.