
On 14 October, a homeowner in Sydney watched their premium roller blind tilt dangerously to one side after a single plastic clip finally gave way. It’s a frustrating moment that makes many people think they need to bin the whole unit and start again. We agree that dealing with sagging or falling blinds is a major headache, especially when you’re worried about drilling unnecessary holes in your window frames. There’s no reason a small piece of broken hardware should mean buying a whole new set of window coverings or paying for an expensive call-out fee.
The great news is that you can fix this yourself without waiting for a repairman to show up. This guide teaches you how to find the exact replacement blind brackets you need to restore your window coverings to their former glory. By following our simple steps, you can complete a professional-standard repair in under 30 minutes. We’ll show you how to measure your current hardware for venetian, vertical, or roller blinds and install the new parts with total confidence. You’ll learn to identify different bracket shapes and select the most durable options to keep your home looking sharp for years to come.
Key Takeaways
- Understand the common causes of hardware failure, such as UV exposure and over-tensioning, so you can prevent future damage to your window coverings.
- Learn how to identify and source the correct replacement blind brackets for popular Australian styles, including specific tips for roller blind idle end pins.
- Master the “measure twice, order once” rule to ensure your new hardware fits your head rail perfectly for a seamless, stress-free DIY installation.
- Gain the confidence to safely remove and reinstall your blinds using basic household tools like a drill and level, avoiding the cost of a professional installer.
- Discover how to perform a simple cost-benefit analysis to decide when a quick repair is enough or if it’s time to upgrade to premium, custom-made blinds.
Identifying Your Replacement Blind Brackets: Why They Fail and What You Need
Blind brackets are the unsung heroes of your home decor. These essential hardware components secure the head rail or roller tube directly to your window frame or wall. While they might seem small, they carry the entire weight of your window treatment. Understanding the various types of window blinds helps you identify which specific hardware you’re dealing with, as a roller blind bracket looks nothing like a venetian mount.
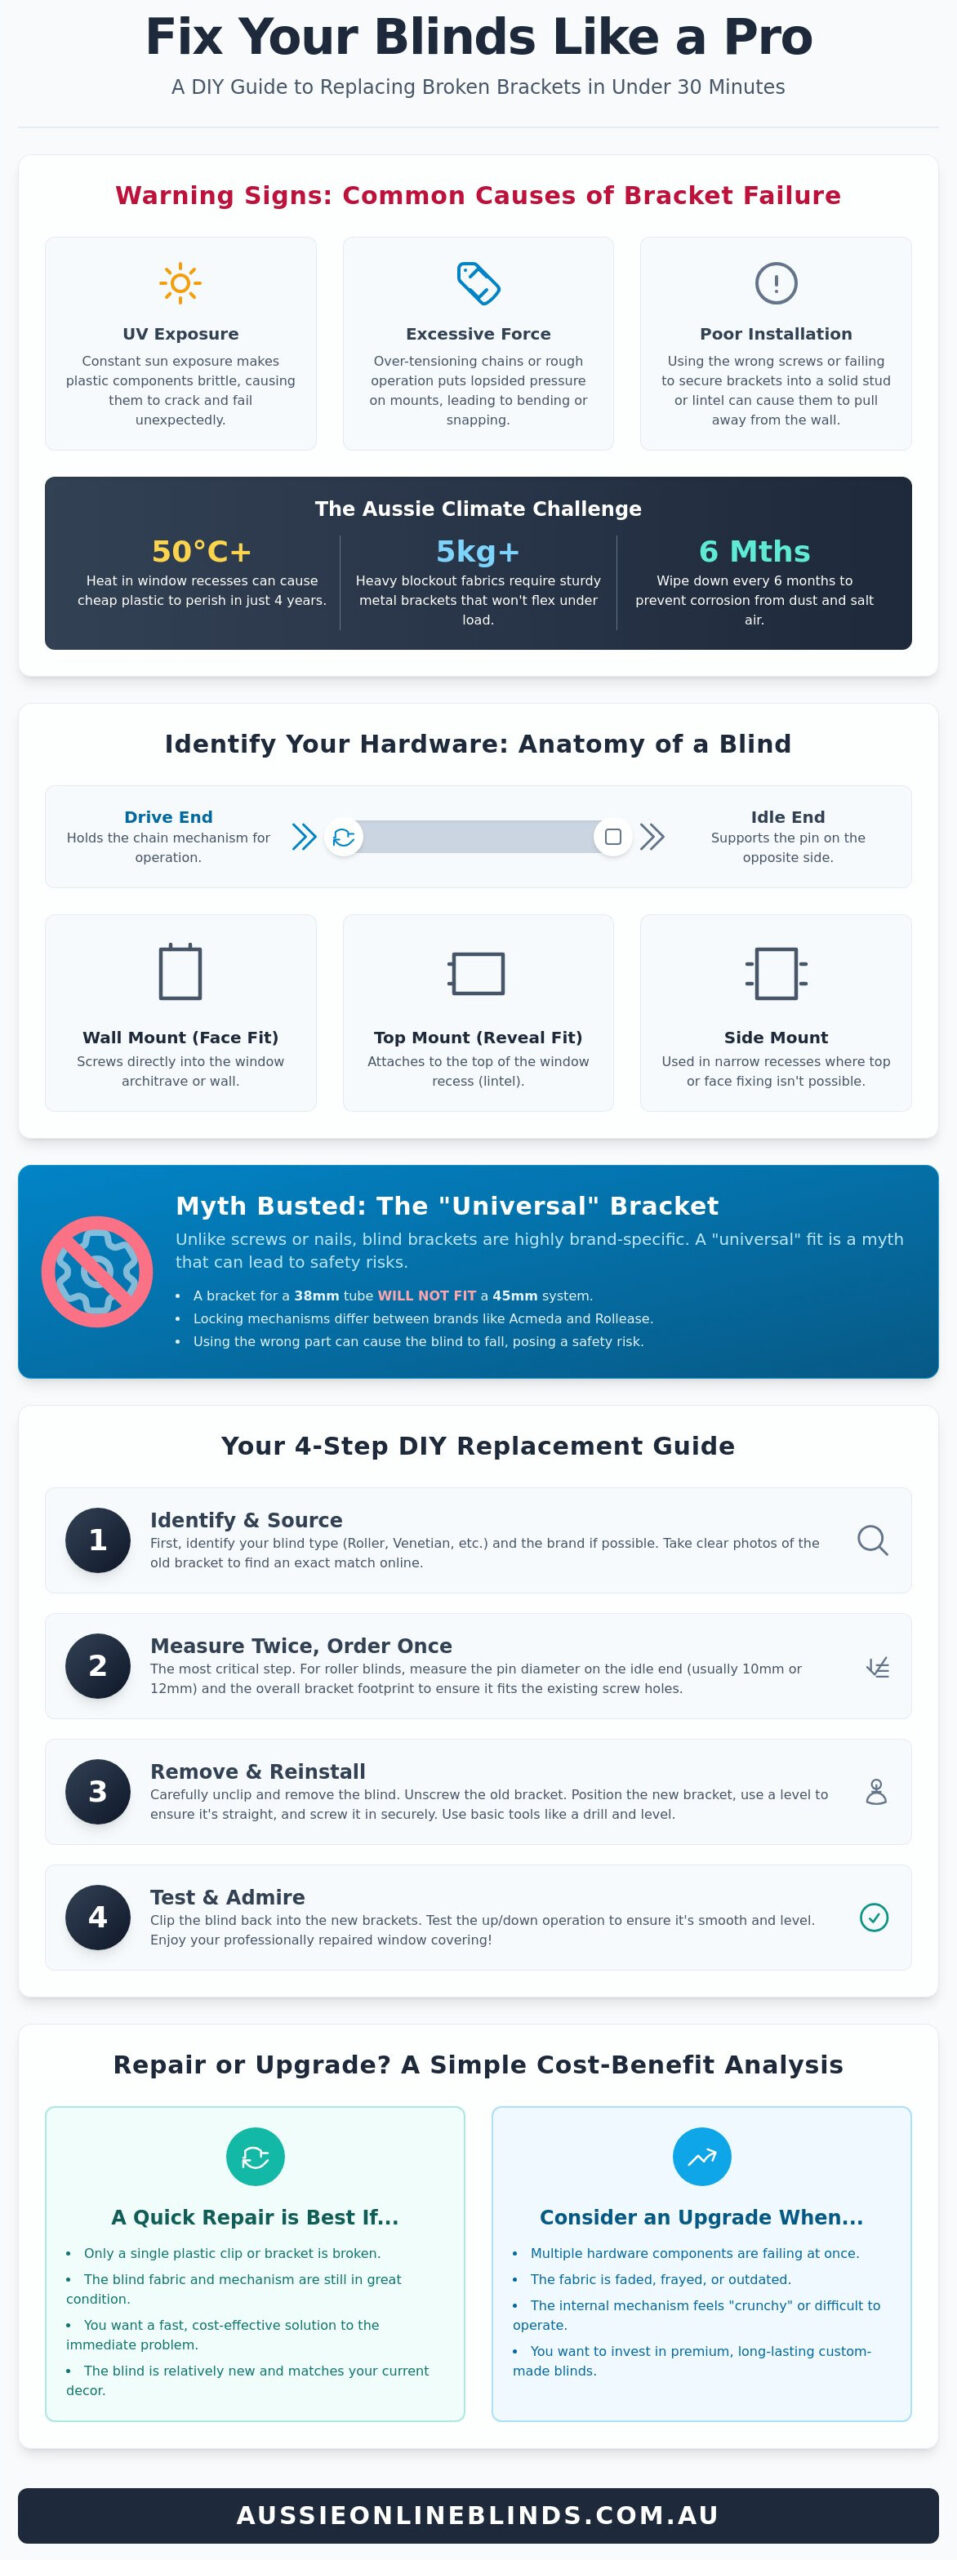
You’ll often hear about “universal” brackets at big-box hardware stores. This is largely a myth. Most replacement blind brackets are brand-specific. A bracket designed for a 38mm roller tube won’t fit a 45mm system, and the locking mechanism for one brand’s slimline venetian often differs from another. Using the wrong part can lead to the blind “jumping” out of its mount during operation, which is a safety risk for your family.
Brackets usually fail for three reasons. First, plastic fatigue from constant UV exposure makes the material brittle. Second, over-tensioning the control chain puts lopsided pressure on the mount. Finally, improper initial installation can cause the metal to bend. If you notice visible cracks, a sagging head rail, or if the blind feels “crunchy” when you move it, it’s time to look for a replacement.
The Anatomy of a Blind Bracket
Most sets consist of a “drive end” and an “idle end.” The drive end holds the chain mechanism, while the idle end (or control end) simply supports the pin. You also need to identify your footprint. Wall mounts (face fit) screw into the architrave, while ceiling mounts (top fit) go into the lintel. Side mounts are common in narrow recesses. Metal brackets are the gold standard here. They offer superior longevity in our climate, as they don’t warp or snap under pressure like budget plastic alternatives.
Common Failure Points in Australian Homes
- Heat and Humidity: In states like Queensland or Western Australia, summer temperatures inside a window recess can exceed 50 degrees Celsius. This intense heat causes cheap plastic to perish in as little as 4 years.
- Heavy Blockout Fabrics: Modern 3-pass blockout fabrics are heavy. A standard 2400mm roller blind can weigh over 5kg, requiring sturdy replacement blind brackets that won’t flex under the load.
- Lack of Maintenance: Dust and salt air in coastal areas can corrode metal or seize internal springs. A quick wipe-down once every 6 months prevents the friction that leads to bracket snapping.
Taking a moment to identify your specific bracket style now saves you the headache of a “dodgy” fit later. We’re here to help you get that factory-direct finish with parts that actually last.
Choosing the Right Bracket for Your Specific Blind Type
Finding the perfect match for your window starts with identifying your hardware system. While many sets look identical at first glance, Australian homes typically feature a mix of local and international systems. Using the correct replacement blind brackets ensures your blinds operate smoothly and stay securely mounted for years. High-quality, custom-made blinds often rely on specialised high-tensile brackets designed to support 25% more weight than standard off-the-shelf options found in big-box retailers.
Roller Blind Brackets (Holland Blinds)
Most Australian roller blinds use either Acmeda, Rollease, or generic hardware styles. You’ll need to check the “idle end” pin diameter before ordering your parts. The idle end is the side opposite the chain drive. A standard pin is usually 10mm or 12mm. If the bracket hole doesn’t match your pin size, the blind won’t sit level or might even fall out during operation. Many modern setups now use dual roller blind brackets. These clever mounts allow you to hang a blockout blind and a sun-filtering sheer on a single set of brackets, saving significant space on your architrave. If you’re unsure which system you have, you can browse our hardware guide to identify your specific parts.
Venetian and Vertical Blind Mounting Hardware
Venetian blinds usually require either box brackets or swivel-arm brackets. Box brackets wrap around the ends of the headrail, making them ideal for heavy timber venetians. Swivel-arm brackets are more discreet and clip into the top of the rail, which is common for slimline aluminium styles. For vertical blinds, the choice depends on where you’re mounting the track. Top-fix clips screw directly into the ceiling or the top of the window recess. Face-fix clips use an L-shaped arm to mount onto the front of the window frame. When replacing these parts, it’s a great time to ensure your installation meets current window covering safety standards to protect everyone in the home.
Honeycomb or cellular shades often use small, clear spring clips. These are designed to be nearly invisible once the blind is snapped into place. Because these shades are lightweight, the clips are tension-based. Always check that your replacement blind brackets are made from durable materials like powder-coated steel to prevent rusting in humid Australian coastal environments. Investing in the right hardware now means you won’t have to deal with sagging rails or stuck mechanisms later. It’s a simple fix that brings your window furnishings back to life instantly.
Measuring and Compatibility: The Key to a Perfect DIY Fit
“Measure twice, order once” isn’t just a catchy phrase; it’s the secret to a stress-free weekend project. When you’re sourcing replacement blind brackets, precision is your best friend. Start by measuring the width and height of your existing head rail. Most standard Australian roller blinds use a specific profile-shaped bracket that must match the rail’s footprint exactly. If the bracket is even 2mm off, the blind won’t sit securely, which can lead to it rattling or falling during operation.
Compatibility goes beyond just the metal plate. You need to ensure the bracket works with your existing hardware. For instance, your replacement chain joiners and control drives must sit flush within the bracket’s housing. While you’re updating your hardware, it’s a great time to ensure your setup meets the new federal safety standard for corded window coverings. These guidelines help prevent strangulation risks, making your home safer for kids and pets. Check your screw hole alignment before you buy. If you can reuse existing holes in the wall, you’ll save yourself the hassle of patching and painting.
Essential Measurements for Roller Blinds
Roller blinds are the most common DIY fix in Australia. To get the right replacement blind brackets, pull out your tape measure and check these three things:
- Internal Tube Diameter: Most Aussie rollers are 38mm, 45mm, or 50mm. Your bracket’s “pin” or “drive” must fit this specific size.
- Drop Distance: Measure from the top of the bracket to the centre of the pin. This ensures the fabric clears the window frame when rolling.
- Plate Width: If you have narrow window reveals, ensure the bracket base isn’t wider than the available timber or plaster space.
Troubleshooting Misaligned Brackets
It’s a win if your new brackets line up with the old drill holes. If they don’t, don’t panic. You can easily drill new holes, but you’ll need the right hardware. If you’re mounting into plasterboard, always use high-quality wall anchors or toggles. A standard screw alone won’t hold the weight of a heavy blockout blind over time. It’s a small investment that prevents the blind from pulling out of the wall.
Check that your brackets are perfectly level. If one side is even slightly higher, the fabric will “telescope.” This means the blind rolls up unevenly and bunches at one end, which eventually frays the edges. Use a spirit level to confirm everything is straight before you tighten those screws for the final time. A level blind operates smoothly and looks professional.
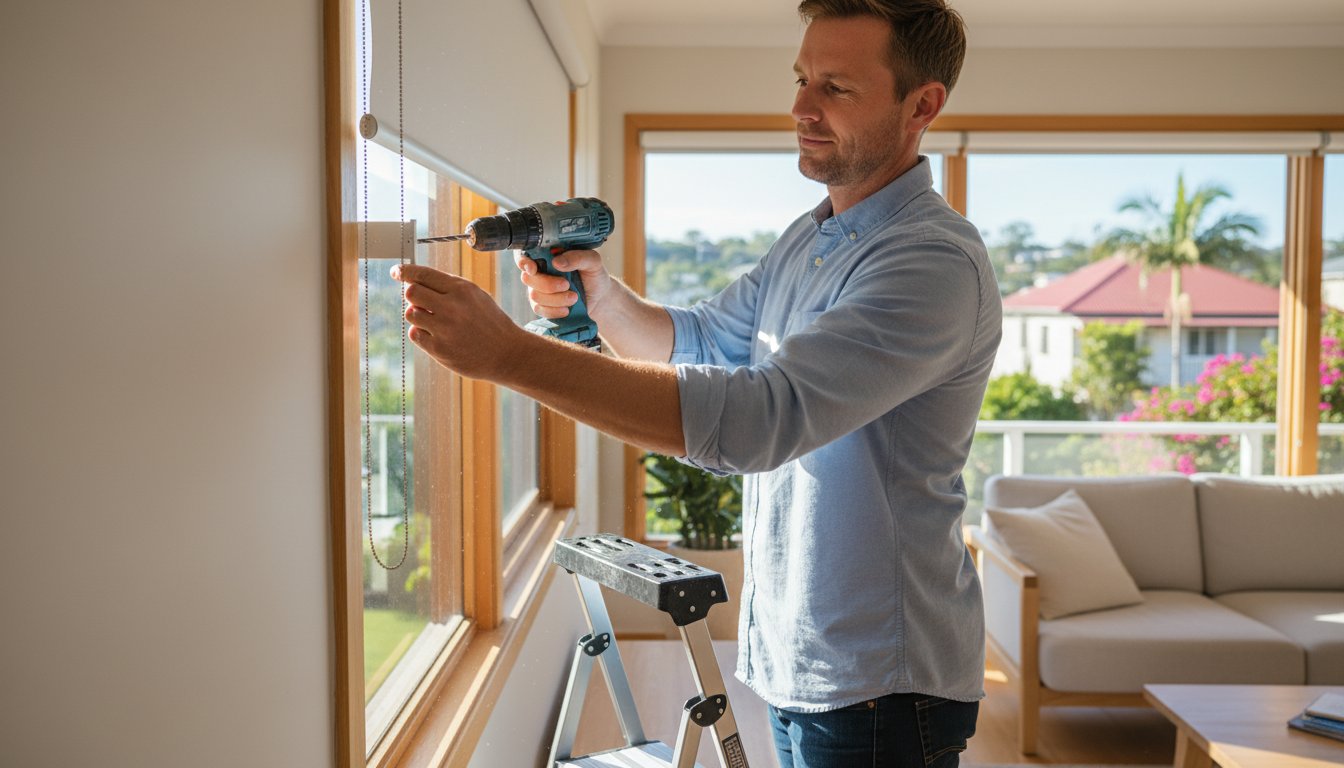
How to Replace Blind Brackets: A Step-by-Step DIY Guide
You’ve got your parts and your can-do spirit ready. Replacing your hardware is a straightforward task that usually takes less than 15 minutes per window. Having the right gear on hand makes the process seamless and professional. Gather these essentials before you begin:
- Cordless drill with timber and masonry bits
- Spirit level for a perfectly horizontal finish
- Phillips head screwdriver
- Safety glasses to block falling debris
- A lead pencil for marking
Removing the Blind Safely
Start by retracting the blind fully. This simple step protects the fabric or slats from getting caught, creased, or soiled during the process. For roller blinds, you’ll typically encounter a spring-loaded pin on the idle end or a plastic swing-gate on the bracket. Gently depress the pin or flick the gate open to release the roll from the mount. If your window is wider than 150cm, it’s a smart move to have a second person help you. This prevents the blind from bending or falling while you’re busy at the opposite end. Place the blind on a clean towel or carpeted area once it’s down.
Unscrew the old hardware and set it aside for recycling. Take a moment to inspect the mounting surface. If the timber is split or the masonry has crumbled, you shouldn’t reuse the same holes. You want your new replacement blind brackets to have a fresh, solid grip on the wall or frame to ensure long-term durability and safety.
Installing the New Brackets
Position your replacement blind brackets and use your pencil to mark the exact hole locations. Accuracy here is vital for a smooth-running blind that doesn’t track to one side. For timber frames, drill 2mm pilot holes to ensure the wood doesn’t split when you drive the screws home. If you’re mounting into brick or concrete, use a 6mm masonry bit and high-quality wall plugs. Drive the screws in until they’re firm, but avoid over-tightening. Stripping a screw head makes future maintenance much harder and can warp the metal of the bracket.
Click the blind back into place and listen for the satisfying snap of the bracket gate or the engagement of the pin. Test the operation by raising and lowering the blind three times. It should move freely without catching or making unusual noises. If you’ve realised your current window coverings are too far gone for a simple fix, explore our premium custom-made blinds for a durable, factory-direct solution that’s easy to install yourself.
Beyond Brackets: When to Consider a Full Blind Upgrade
Sometimes, hunting for replacement blind brackets is like putting a new tyre on a car with a blown engine. While a bracket swap is a great quick fix for a minor mishap, you’ll eventually reach a point where the cost of individual repairs outweighs the value of the blind itself. If your hardware is snapping frequently, it often indicates the plastic components have become brittle from years of intense UV exposure. Australian conditions are notoriously harsh on window furnishings, and even the best hardware has a natural lifespan. Choosing to invest in new custom blinds often proves more economical than constant maintenance on an aging system.
Signs Your Blinds Are Past Their Prime
You can tell a blind is ready for retirement by looking at the fabric and the internal movement. If you notice frayed edges, sun-bleached patches, or a mechanism that grinds despite your best efforts, it’s time for a change. Since 2020, the technology behind indoor roller blinds has advanced significantly. Modern designs offer much smoother operation and better moisture resistance than older models. Common signs of failure include:
- Difficulty finding replacement blind brackets for obsolete systems manufactured over 10 years ago.
- Fabric that has lost its structural integrity and sags in the middle.
- Internal springs or chains that skip or catch during use.
Many homeowners are now switching to blockout roller blinds to solve these issues. These modern options provide 100% light blockage and improved thermal efficiency, which helps lower cooling costs when the temperature hits 40 degrees outside. When upgrading, it’s also the perfect opportunity to install the correct blind child safety devices to protect young children and pets from cord-related hazards in your home.
The Aussie Online Blinds Difference
Choosing to upgrade doesn’t have to be a headache. We’ve designed our system to be a straightforward DIY project that any Aussie can handle with confidence. We use premium, heavy-duty hardware as our standard, ensuring your new window coverings won’t need repairs for a long time. As a family-owned business, we manufacture everything right here to suit our local climate. You get factory-direct savings and the peace of mind that comes with a product built for durability.
Our simple measurement system removes the guesswork. You get a perfect fit every single time without the high price tag of a professional installer. We’re here to support you at every step, from the first measurement to the final click of the bracket. If your old blinds are causing more frustration than they’re worth, a fresh start is often the smartest move for your home and your budget.
Restore Your Windows With Confidence
Getting your window furnishings back into top shape doesn’t have to be a headache. By correctly identifying your specific blind type and taking precise measurements, you can easily source the right replacement blind brackets to secure your window coverings for years to come. Sometimes a simple hardware fix is all it takes to breathe new life into a room. However, if your blinds are showing significant wear, upgrading to a modern custom solution might be the smarter long-term investment for your home’s comfort and style.
As a family-owned Australian business, we’re proud to support local homeowners with expert advice and reliable hardware. We provide factory-direct savings for DIY installers, which means you get premium quality without the unnecessary retail markups. Every custom product in our range comes with a 3-year warranty, so you can shop knowing your investment is protected. We’ve made the measurement and installation process straightforward and stress-free for every Australian household.
Browse our range of high-quality DIY blinds and hardware and take the first step toward a refreshed home. You’ll be amazed at how much difference the right hardware makes to your daily living!
Frequently Asked Questions
Can I use any brand of bracket for my roller blinds?
You generally can’t swap brands because roller blind brackets are designed to fit specific pin ends and chain drives. About 90% of Australian roller blinds use either the 38mm or 45mm tube system, but the bracket shape varies between manufacturers like Acmeda or Hunter Douglas. Always check the dimensions of your existing hardware to ensure a secure fit for your custom-made blinds.
How do I remove a roller blind from its bracket?
You can remove most roller blinds by first locating the spring-loaded pin on the non-control side. Simply rotate the clear plastic wheel or pull the pin toward the center of the blind to release it from the bracket. Once that side is free, lift the chain-drive end out of its cradle. It’s a quick process that takes less than 60 seconds once you find the release mechanism.
Why does my blind keep falling out of the bracket?
Your blind usually falls out because the brackets are mounted too far apart or the spring-loaded pin has lost its tension. A gap of just 3mm wider than the blind width can cause the tube to slip during operation. Check if the bracket is bent or if the screws have loosened in the wall. Fixing this ensures your replacement blind brackets stay secure and your window remains functional.
Are metal blind brackets better than plastic ones?
Metal brackets are superior for larger or heavier blinds because they don’t become brittle over time like plastic alternatives. While plastic brackets are common in budget, off-the-shelf kits, premium Australian-made blinds often use powder-coated steel. These metal components can withstand the 40-degree heat of an Australian summer without warping, providing a much longer lifespan for your window furnishings.
What tools do I need to replace blind brackets?
You’ll only need a few basic tools: a Phillips head screwdriver, a power drill with a 3mm bit for pilot holes, a spirit level, and a steel tape measure. Using a level is vital to ensure your blind rolls straight. If you’re mounting into masonry or brick, you’ll also need a 6mm masonry bit and matching wall plugs to ensure the installation is rock solid.
Can I replace the brackets without taking the blind down?
You can’t replace the brackets while the blind is still mounted because the hardware is tucked behind the roll. You’ll need to take the blind down first to access the screws and position the new brackets correctly. This step is actually safer for you and prevents the fabric from getting marked or damaged during the installation of your new replacement blind brackets.
Where can I find replacement brackets for old or discontinued blinds?
You can find brackets for older systems through specialist Australian online retailers or by visiting local hardware stores with your old bracket in hand. Many systems from 10 years ago are still compatible with modern Acmeda-style hardware. If the exact model is no longer made, you might need to replace both the brackets and the end plugs to ensure a perfect match.
How much does it cost to replace blind brackets myself?
Replacing the brackets yourself is very affordable, usually costing between A$5 and A$20 for a pair of standard brackets. This DIY approach saves you the A$80 to A$150 call-out fee that most professional installers charge in Australia. By handling the job at home, you’re getting a premium result for the price of a couple of coffees, making it a high-value home improvement. Before you finalise your new installation, take a moment to review the recommended blind child safety devices that should accompany any corded blind system in an Australian home.