
A single millimeter of error can be the difference between a sleek, weather-tight patio and a frustrating gap that lets the wind howl through. Learning how to measure for outdoor blinds isn’t about being a math whiz; it’s about knowing exactly where to place your tape measure on those tricky patio posts or uneven beams. We know the feeling of hovering over that order button, worrying if your measurements are truly spot on or if a sloping floor will ruin the final look. It’s completely normal to feel a bit nervous when you’re taking the lead on a home upgrade, especially with 2026 safety standards now requiring cordless designs for every modern home.
We’re here to help you trade that hesitation for professional confidence. This guide promises to help you master the art of precision measuring with a step-by-step checklist, ensuring your custom outdoor blinds fit perfectly the first time. We’ll cover everything from choosing between a recess and face fit to accounting for the latest motorized technology. You’ll gain the skills to achieve a high-end, bespoke result for your outdoor space without the professional price tag.
Key Takeaways
- Discover why a high-quality metal tape measure and spirit level are essential tools for achieving a professional finish on your own.
- Learn how to choose between a Recess and Face Fit mount to perfectly suit your patio’s unique structure and style.
- Master how to measure for outdoor blinds using the “Rule of Three” method to ensure your custom order fits right the first time.
- Identify how to navigate common tricky spots like downpipes and sloping floors to prevent unwanted gaps or light leaks.
- Gain the confidence to place your order online by using our final verification checklist to catch any small errors before you commit.
Preparation & Tools: The DIY Measuring Pre-Flight Checklist
Getting ready to transform your outdoor space starts with a bit of solid groundwork. If you want a result that looks like it was handled by a pro, you can’t just wing it with a sewing tape measure and a scrap of cardboard. Preparation is the secret sauce that separates a “perfect fit” from a “good enough” attempt. Taking the time to prep your space ensures that the process is smooth and stress-free from the very first measurement.
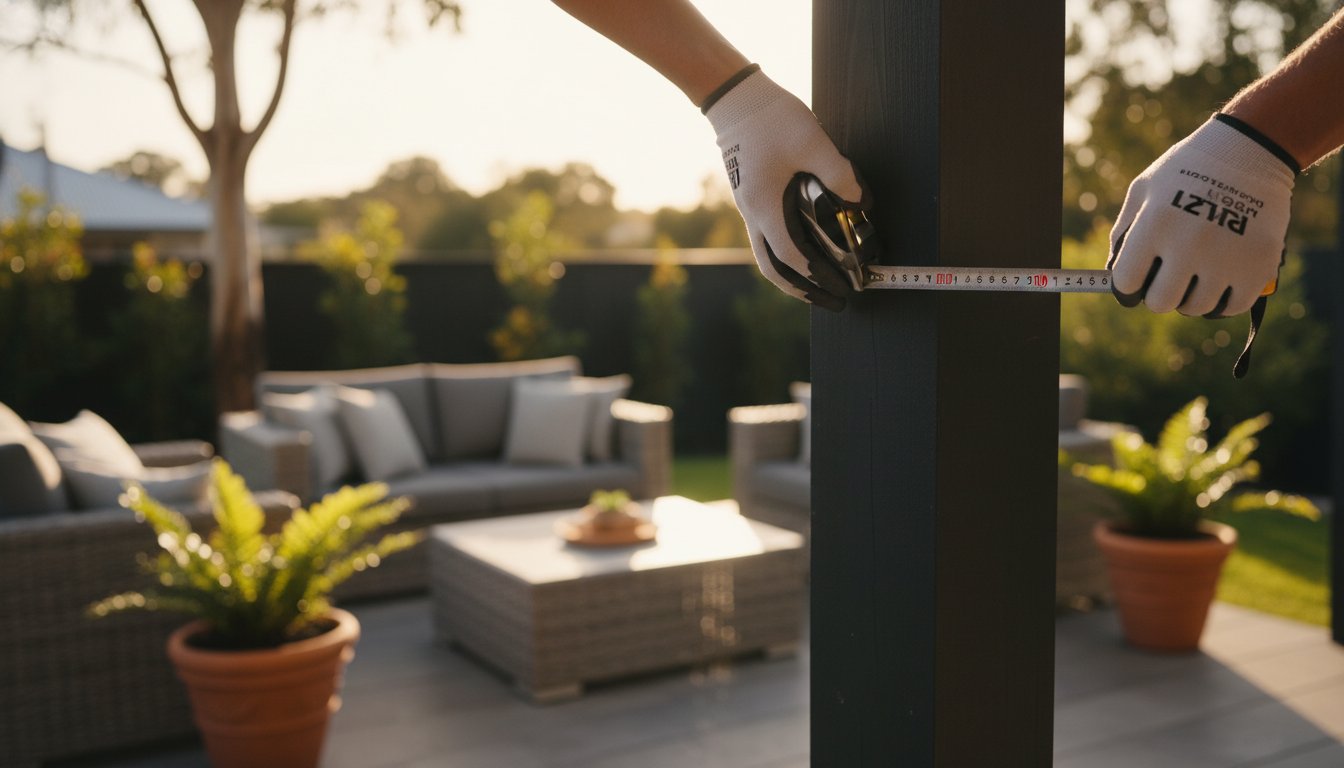
Understanding exactly how to measure for outdoor blinds begins with gathering the right gear. A high-quality metal tape measure is non-negotiable. Fabric or plastic tapes can stretch over time or sag in the heat, leading to errors that might seem small on paper but look huge once your blinds are hanging. For large outdoor openings like wide patios or pergolas, accuracy is everything. We want your custom blinds to slide into place with ease, and that starts with a tape you can trust.
If your patio spans more than three meters, we suggest using a laser measure alongside your metal tape. It’s a fantastic way to get a quick, precise reading without the tape sagging in the middle. Whether you are looking at different types of window blinds or specific heavy-duty outdoor fabrics, the foundation of a great result is always the same: precision. Using a laser measure provides a secondary check that gives you total peace of mind before you hit the checkout button.
Don’t rely on loose scraps of paper that can easily get lost or misread. Use a dedicated measuring sheet to keep your numbers organized. This keeps your head clear and ensures you don’t mix up the width and the drop when it’s time to place your online order. A clean, organized sheet is your best defense against simple clerical errors that can lead to costly mistakes.
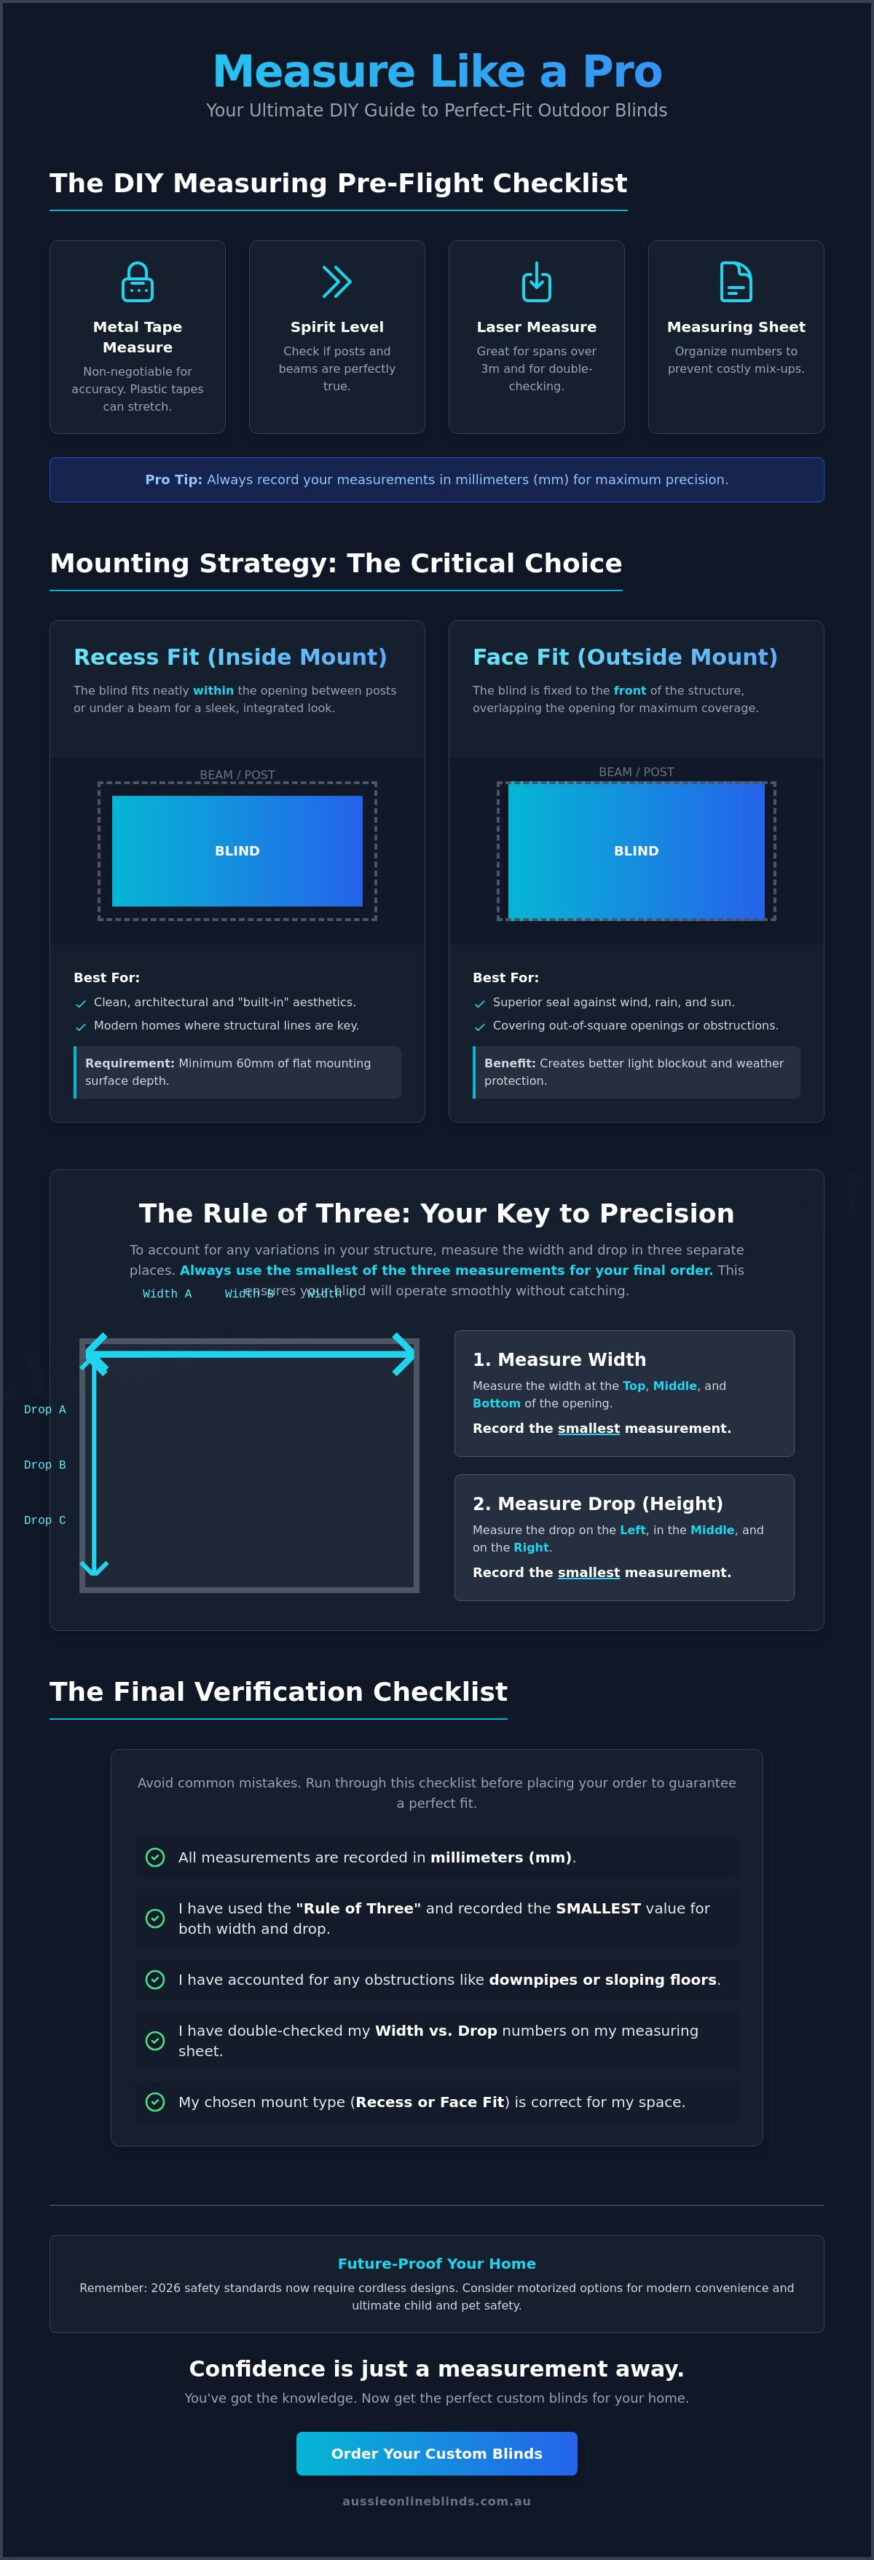
The Essential DIY Measuring Toolkit
Always record your measurements in millimeters (mm). Using centimeters or inches can lead to rounding errors that ruin a custom fit. Grab a spirit level to check if your posts or beams are actually true. Most outdoor structures have a bit of a lean or a slight bow, and knowing if an opening is “out-of-square” helps you decide on the best mounting strategy. You can check out the only toolkit you will need for installing blinds in 2026 to make sure you have every bit and driver ready before your order arrives.
Setting Up Your Measuring Environment
Before you even pull out the tape, clear the area. Move any pot plants, furniture, or outdoor toys that might get in your way. A clear space allows you to stand comfortably and get the tape flush against the mounting surface. If you’re tackling a large opening, ask a friend or family member to hold the other end of the tape. It’s much easier to get an accurate read when you aren’t stretching to reach both sides at once. Finally, give the posts or beams a quick wipe down. Removing dust, grit, or cobwebs ensures your tape measure sits perfectly flat against the surface for an honest reading.
Recess vs. Face Fit: Choosing Your Mounting Strategy
Deciding exactly where your blinds will sit is the most important choice you’ll make after picking your fabric. This decision dictates the final look of your patio and how well it stands up to the elements. A Recess Fit, also known as an Inside Mount, means the blind sits neatly within the opening between your posts or under a beam. A Face Fit, or Outside Mount, is when the blind is fixed to the front of the structure, overlapping the opening entirely. Understanding these options is a vital step in learning how to measure for outdoor blinds effectively.
Your choice directly impacts how your space handles the local climate. Recess fits offer a sleek, integrated look that architects love, but they can leave tiny gaps where the fabric meets the posts. If you live in a particularly windy area or want to block every bit of glare, a Face Fit might be your best friend. By overlapping the opening, a Face Fit creates a superior seal against the wind and sun. This makes it a popular choice for exposed Australian verandas and pergolas where weather protection is the top priority.
When to Choose a Recess Fit
We suggest a Recess Fit for homeowners who want that clean, flush finish. Before you commit, check that your beams have enough depth; you’ll typically need at least 60mm of flat surface to house the headbox or brackets safely. This style works beautifully on modern homes where the structural lines are part of the aesthetic. It provides a “built-in” feel that doesn’t distract from your home’s architecture. If you’re still on the fence, our detailed breakdown of Recess vs Face Fit Blinds: The Ultimate DIY Guide for Australian Homeowners offers even more practical tips to help you decide.
When a Face Fit is the Better Option
A Face Fit is often the problem-solver for tricky outdoor areas. It’s the ideal choice if your posts are too narrow or if you have obstructions like door handles, downpipes, or light fittings inside the reveal. To ensure a professional result, you’ll want to include a healthy overlap in your measurements. We suggest adding at least 50mm to the width on both sides. This extra coverage ensures the blind performs its job perfectly without any annoying light leaks at the edges. Once you’ve settled on your mounting plan, you can confidently browse our high-quality DIY Blinds to start your project journey.
Step-by-Step Accuracy: Measuring Width and Drop
Once you have decided on your mounting strategy, it’s time to get down to the physical work. Even the most beautiful patio can be let down by a blind that is a few millimeters too wide or a fraction too short. Learning how to measure for outdoor blinds with professional accuracy involves a simple but vital technique we call the “Rule of Three.” This method accounts for the fact that very few outdoor structures are perfectly square. Houses settle, timber posts warp in the sun, and concrete floors often have a slight pitch for drainage.
The “Rule of Three” requires you to take three separate measurements for both the width and the drop. For the width, measure at the top, the middle, and the bottom of the opening. For the drop, measure at the left, the center, and the right. By capturing these variations, you ensure that your custom blinds will function smoothly without sticking or leaving awkward gaps that invite the wind inside.
Measuring Width for a Perfect Seal
Width is the distance between the two innermost points of the opening. When measuring between timber posts, you might find that the distance at the top is different from the bottom due to natural warping. If you are ordering a Recess Fit, always record the smallest of your three width measurements. This ensures the blind doesn’t jam against the posts when you try to roll it down. For those choosing Zipscreen Outdoor Blinds or Deep Channel Blinds, this precision is even more critical because the fabric must sit perfectly within the side tracks to maintain that famous tensioned finish.
Measuring the Drop (Height)
Measure from the top of your mounting point down to the floor or the top of your railing. Unlike indoor blinds where you often record the shortest height, outdoor blinds usually require the longest drop measurement. This ensures the blind closes fully to the ground, creating a complete seal against insects and debris. If you prefer your blinds to hover just above the tiles to avoid collecting dirt or moisture, we suggest allowing for a 10-20mm clearance in your final calculation. Remember to account for the headbox size in your total drop height so the bottom bar sits exactly where you want it when fully extended. Whether you are installing Straight Drop Blinds or Wire Guide Blinds, getting the drop right is the key to that high-end, tailored look.
Accounting for Obstructions: The Pro’s Guide to Tricky Spaces
The reality of Australian outdoor living is that very few patios are laboratory-perfect. When you’re figuring out how to measure for outdoor blinds, you’ll likely run into structural quirks like downpipes, door handles, or light fittings that don’t want to move. Identifying these permanent fixtures early is the difference between a blind that glides smoothly and one that catches every time you use it. You should also take a close look at your timber beams. Older timber can sometimes be too narrow or soft to hold a heavy bracket, so ensure you have at least 60mm of solid, healthy wood for a secure fix.
Corner junctions are another area where DIYers often get tripped up. If you have two blinds meeting at a 90-degree angle, you can’t just measure both openings to the edge. Learning how to measure for outdoor blinds in these tricky spots involves accounting for the space the headboxes will take up so they don’t knock into each other. Usually, this means deducting the width of one headbox from your measurement to allow them to sit flush at the corner. This prevents unsightly gaps and ensures your high-quality Zipscreen Outdoor Blinds can operate without interference.
Navigating Downpipes and Handles
If a downpipe is sitting right where your track needs to go, don’t panic. You can often use build-out blocks or spacers to move the blind forward just enough to clear the obstruction. This is often the moment where switching from a Recess Fit to a Face Fit makes the most sense. It allows the blind to sit in front of the downpipe rather than fighting for space inside the opening. Don’t forget to measure the projection of your door handles too; you want your fabric to clear them by at least 10mm to avoid snags and tears.
The Sloping Floor Strategy
Most outdoor floors are designed with a slight pitch to help rainwater run away from the house. This means your drop measurement might be 20mm longer on one side than the other. When this happens, record the drop at both the highest and lowest points. A heavy-duty bottom bar is a great tool here because its weight helps the fabric hang straight, masking minor floor level variations for a professional look. For a deeper dive into these technicalities, check out our guide on DIY Blinds: Your Ultimate Guide to Measuring & Installing Like a Pro in 2026. This resource will help you navigate the final steps of your project with total confidence.
The Final Verification: Avoiding Common DIY Measuring Mistakes
Before you head to the checkout, take a deep breath and look at your numbers one last time. You’ve followed the steps, identified the obstructions, and chosen your mounting style. Now comes the most important part of our guide on how to measure for outdoor blinds: the final verification. This is the “sanity check” that ensures your vision for a perfect patio becomes a reality without any surprises when the delivery truck arrives. Even seasoned builders use the “Measure Twice, Order Once” rule because it only takes a second to misread a tape, but it takes much longer to fix an order once it’s in production.
One of the biggest questions we get from homeowners is about bracket deductions. It’s a common fear that the blind will be too tight because the brackets take up space. The good news is that we have designed our system to be as simple as possible. When you order with us, you don’t need to do any complicated math or subtract millimeters for the hardware. Just provide the exact measurements of your opening as you found them during your three-point check. Our team handles all the technical deductions in the factory to ensure a perfect fit. We want the installation to be the easiest part of your weekend project.
Confirm that every single number on your sheet is recorded in millimeters. It might seem like a small detail, but using centimeters is one of the most frequent causes of ordering errors. Millimeters provide the pinpoint precision needed for a truly custom, high-end look. Finally, do a quick visual scan of your space while holding your measuring sheet. If your patio looks roughly twice as wide as it is tall, but your numbers suggest a square, you might have accidentally swapped your width and drop. Trust your eyes; if the numbers don’t look right for the space, measure them one more time.
The Pre-Order Check-Off
Before you click “add to cart,” run through this quick checklist. First, ensure your width and drop are in the correct boxes. It’s a simple mistake that’s easy to make when you’re excited to get started. Second, verify that your chosen blind type, such as our Zipscreen Outdoor Blinds, is suitable for the mounting surface you measured. Finally, think about your daily use and select the correct control side. Whether you want the manual wand or the motorized override on the left or right can make a big difference in how easily you can access it around furniture or posts.
Ready to Transform Your Outdoor Living Area?
Entering your measurements into our website is straightforward and designed to guide you through the process. We’ve built our online store to be as user-friendly as a chat with a neighbor. If you find yourself staring at a tricky corner or an unusual beam and you’re still unsure, don’t guess. Our expert support team lives and breathes outdoor blinds, and we are just a phone call or email away to help you get those numbers right. Taking that final step toward a cooler, more private home is incredibly rewarding. Browse our range of custom outdoor blinds and start your project today!
Secure Your Perfect Fit and Enjoy Your Patio Today
You now have the professional roadmap to handle your home upgrade with total confidence. By selecting the right mounting strategy and applying the “Rule of Three” for your width and drop, you’ve already bypassed the most common DIY pitfalls. Mastering how to measure for outdoor blinds is simply about taking that extra moment to verify your numbers so you can enjoy a seamless installation later on. There is no need to feel overwhelmed when you have a clear plan and the right tools in your hands.
We’re a proud Australian family-owned and operated team, and we ensure all our products are custom-made for the Australian climate. With a 3-year warranty on all DIY products, you can feel secure knowing your new outdoor area is built to last. It’s time to turn those precise measurements into a beautiful reality. Start configuring your custom outdoor blinds now and see how easy it is to achieve professional results. You’ve done the hard work; we’re just here to help you finish the job and enjoy your backyard again.
Frequently Asked Questions
Should I measure in centimetres or millimetres?
Millimetres are the industry standard for all custom orders. Centimetres can lead to rounding errors that ruin a precise fit, and even a small mistake can be visible once the blind is installed. Recording your numbers in millimetres ensures your custom outdoor blinds slide into place perfectly. Most professional manufacturing systems, including ours, are built around this level of detail to guarantee that high-end, tailored look for your patio.
What if my patio posts are not perfectly straight or square?
Don’t worry if your posts aren’t perfectly square; it’s very common in Australian outdoor spaces. When learning how to measure for outdoor blinds in an uneven opening, always use the smallest width for a Recess Fit. This prevents the blind from jamming against the posts as it rolls down. For the drop, use the longest measurement to make sure you get a full seal at the bottom of the opening.
Do I need to make deductions for the brackets and tracks myself?
You don’t need to worry about making any technical deductions yourself. We ask for the exact opening size of your space, and our factory team calculates the necessary allowances for brackets and tracks. This simplifies the process for you and reduces the risk of calculation errors. Just provide the raw measurements of the space you want to cover, and we’ll take care of all the hardware math during production.
How much overlap should I allow for a Face Fit outdoor blind?
We suggest adding at least 50mm of overlap to each side of the opening for a Face Fit. This creates a total width increase of 100mm, which is essential for blocking out wind and light gaps at the edges. A generous overlap ensures the blind covers the entire reveal and provides the maximum protection and privacy you expect from a high-quality outdoor installation that sits on the face of your posts.
Can I still install outdoor blinds if my floor is sloping?
A sloping floor is no problem as long as you record the longest drop measurement. This ensures that the blind can reach the ground at every point across the opening for a complete seal. While a slight gap might exist at the higher end of the floor, our heavy-duty bottom bars are designed to sit level and mask these variations, keeping your outdoor space looking sharp and professional even on an angle.
What is the most common mistake people make when measuring for DIY blinds?
The most frequent error is accidentally swapping the width and drop measurements on the order form. It’s a simple clerical mistake that can be costly to fix once the blinds are made. Another common blunder when figuring out how to measure for outdoor blinds is using a soft fabric tape measure that stretches. Always use a metal tape and double-check your numbers before you hit the final submit button.
How do I measure if I want two blinds to meet at a corner?
When two blinds meet at a corner, you need to account for the depth of the headboxes so they don’t clash. Measure both openings all the way to the corner, then deduct the width of one headbox from one of the blinds. This allows the two units to sit flush together without the hardware knocking into each other. This creates a clean and tidy corner junction that looks like it was professionally designed.
Is a laser measure better than a traditional metal tape measure?
A laser measure is a fantastic tool for wide patio spans, but it shouldn’t completely replace your metal tape. Laser measures are superior for spans over 3 metres because they eliminate the “sag” that happens with a traditional tape. However, a metal tape is still better for measuring small depths or checking for obstructions in tight corners. Using both together gives you the ultimate accuracy for your DIY project.