
That stubborn, jammed chain might be a simple ten minute fix, but those yellowed, brittle edges on your fabric are a clear sign that the sun has finally won. It’s incredibly frustrating when a window treatment stops behaving, especially when you’re worried a professional repair bill will cost more than the blind itself. We’ve all stood there tugging at a cord, feeling that mix of annoyance and embarrassment as a frayed edge catches in the mechanism. Understanding exactly when to replace roller blinds rather than patching up an old unit can save you both money and a significant amount of stress.
We know you value a home that looks sharp and functions perfectly without breaking the bank. This guide shows you how to diagnose common blind failures and provides simple instructions for mechanical repairs you can handle yourself. You’ll also learn the 50 percent rule for repair costs and why 2024 safety standards for cordless designs might make an upgrade the smartest choice for your family. We’ll give you the confidence to either fix what you have or measure and order a beautiful, custom replacement that fits your space perfectly.
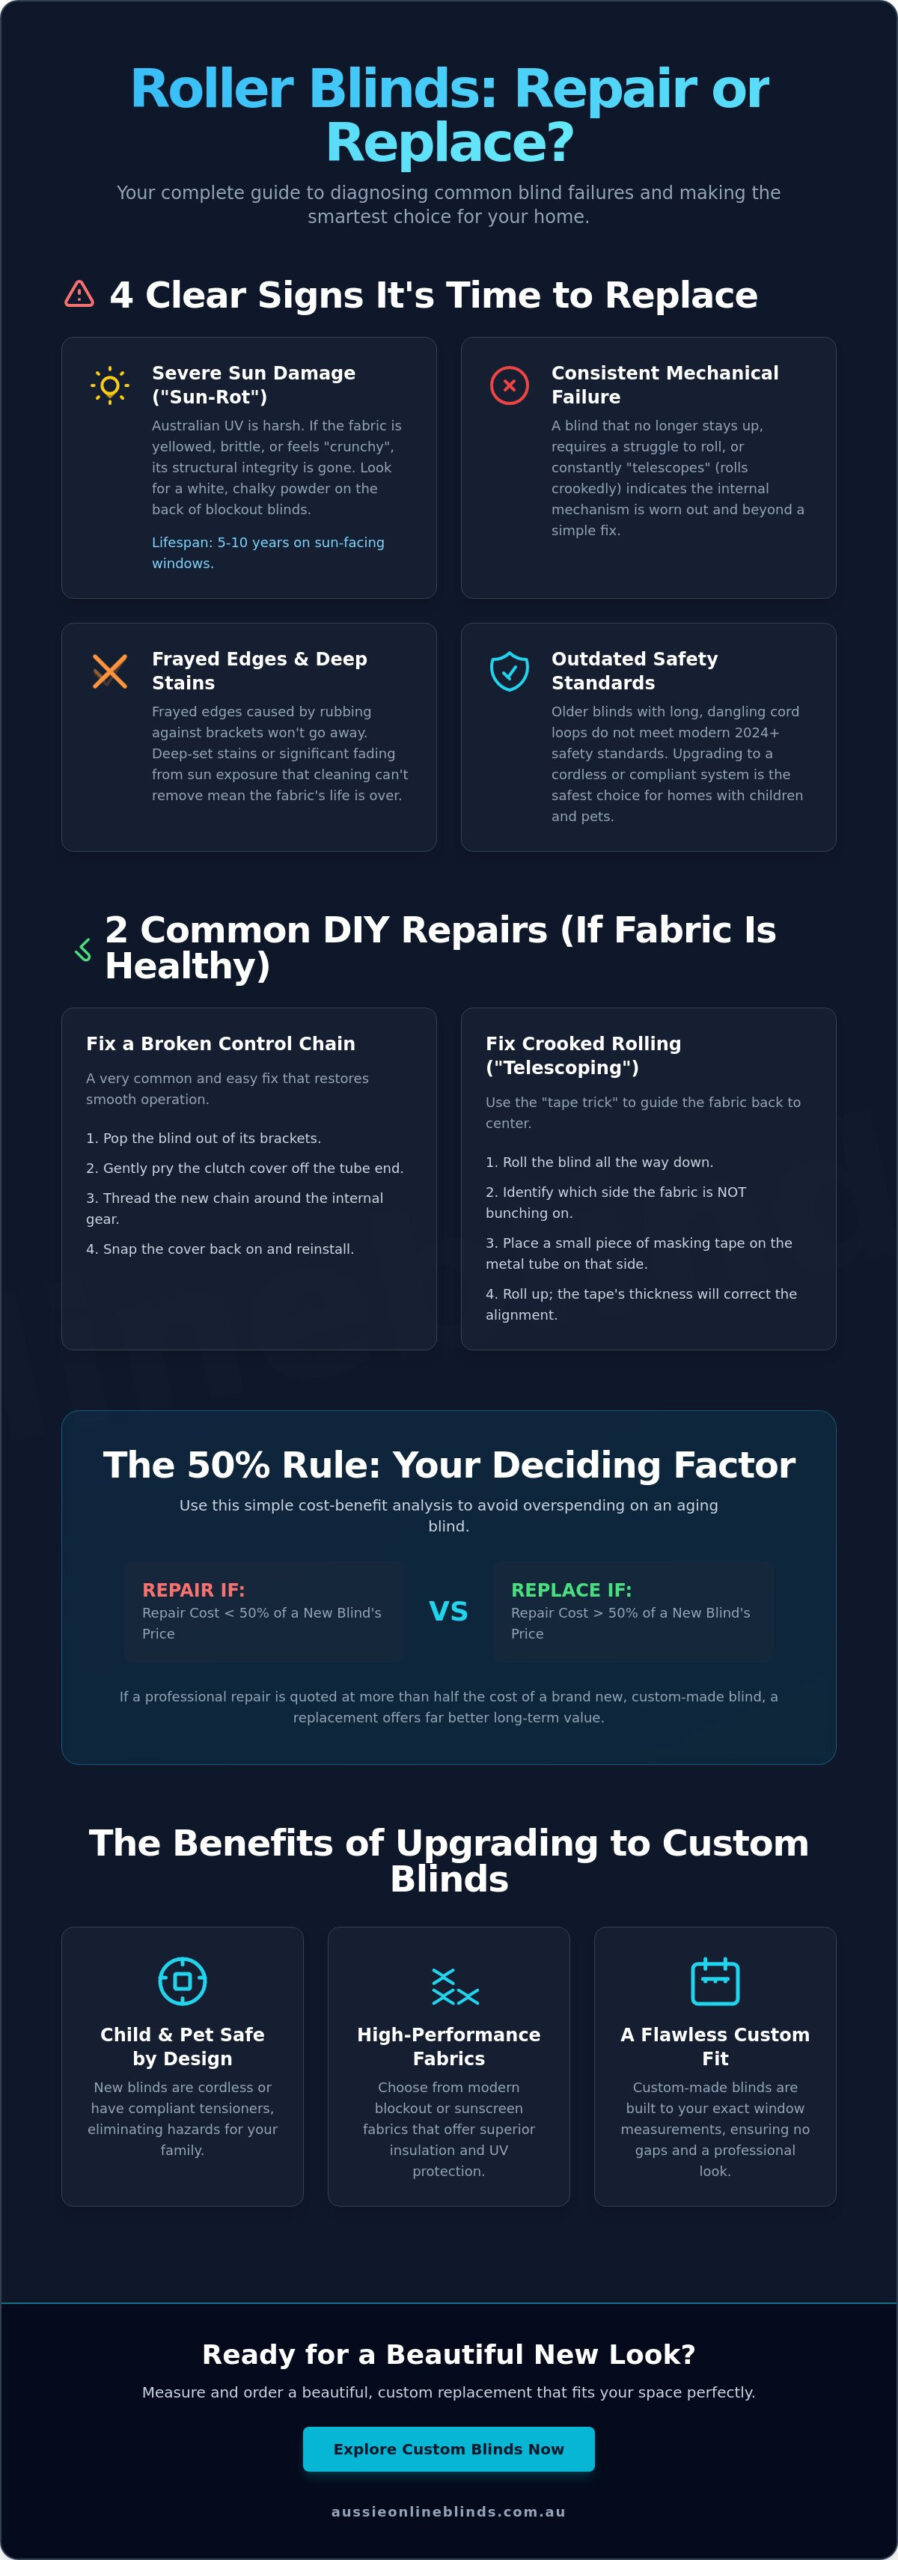
- Keep your home looking sharp by identifying the clear signs of fabric “sun-rot” and brittleness that indicate your blinds have reached their functional limit.
- Restore smooth operation to your windows with our simple DIY steps for fixing jammed control chains and adjusting internal spring tension.
- Save money and avoid frustration by using the practical 50 percent rule to help you decide exactly when to replace roller blinds.
- Prepare for a beautiful new look by following our straightforward guide on safely removing old brackets and hardware.
- Ensure lasting style and performance by choosing high-quality custom blockout or sunscreen fabrics over generic, trim-to-fit retail alternatives.
Identifying the Warning Signs: When to Replace Roller Blinds
Knowing when to replace roller blinds often starts with a simple visual check during your morning routine. We’ve all been there, standing at the window and noticing that the once-crisp fabric now looks a bit tired and yellowed. While a standard window blind is designed for longevity, usually lasting between 8 and 12 years, environmental factors can shorten that lifespan significantly. Deciding exactly when to replace roller blinds isn’t just about keeping up with interior trends; it’s about maintaining a safe, functional, and energy-efficient home environment.
Operational failure is often the first sign that the internal components are reaching the end of the road. If your blind no longer stays level or requires a struggle to roll up smoothly, the internal mechanism is likely worn out. You might notice the fabric “telescoping” to one side, which eventually leads to frayed edges as it rubs against the brackets. While some tension issues are fixable, a blind that consistently fails to hold its position suggests that the internal spring or drive unit has lost its structural integrity. Aesthetic mismatches like deep-set stains, fading from years of sun exposure, or yellowing that cleaning cannot fix are also clear indicators that an upgrade is due.
The Impact of Australian UV on Blind Longevity
Our local climate is notoriously tough on window furnishings. Intense sunlight can break down synthetic fibres in as little as 5 to 10 years, especially on north-facing windows. You should look for “chalking” on the back of blockout coatings, where the material starts to flake off like white powder. This is a sign of “sun-rot” and indicates the fabric has become brittle. Brittle fabric poses a serious tearing risk during daily use, and once the structural bond of the weave is gone, no amount of repair can restore it. If the edges feel crunchy or snap when you gently flex them, the sun has won the battle.
Safety and Compliance Standards for 2026
Safety is a non-negotiable factor in modern home improvement. New safety standards, specifically ANSI/WCMA A100.1-2022 which took effect on June 1, 2024, require all stock window coverings to be cordless or have inaccessible cords. By December 2024, the CPSC approved federal standards for custom coverings to eliminate free-hanging cords entirely. If you have older blinds with dangling loops or frayed cords, they likely don’t meet these current protection levels. Check your cord tensioner security and look for signs of internal spring fatigue in older cordless models. If your mounting brackets show signs of rust or have pulled away from the wall, it’s safer to start fresh with a modern, compliant system.
Essential Roller Blind Repair Instructions for Common Issues
While we’ve looked at the warning signs of permanent damage, many operational issues don’t require a full upgrade just yet. If your fabric is still in great shape, a quick mechanical tune-up can extend its life by several years. Deciding when to replace roller blinds often comes down to whether the repair is a simple ten minute task or a complex struggle with worn out internal components. Most mechanical hiccups are surprisingly easy to solve with a few basic tools and a bit of patience. Understanding these quick fixes helps you determine How to Fix Window Shades without calling in an expensive specialist.
How to Replace a Broken Roller Blind Chain
Broken chains are one of the most common complaints, but they’re very straightforward to fix. You’ll need a few basics to get started:
- Pliers for snapping joiners into place
- Replacement chain joiners
- A flat-head screwdriver for prying the clutch
First, pop the blind out of its brackets. Use your screwdriver to gently pry the clutch cover off the end of the tube. Thread the new chain around the internal gear, ensuring the beads sit snugly in the notches. Once you’ve snapped the cover back on and reinstalled the blind, check your limit stops. These small plastic clips prevent the blind from rolling too far and putting unnecessary strain on the mechanism.
Fixing Tension and Telescoping Issues
If your blind is rolling up crookedly, it’s “telescoping” to one side. A clever way to fix this is the “tape trick.” Simply roll the blind all the way down and place a small piece of masking tape on the metal tube on the opposite side of where the fabric is bunching. This tiny bit of extra thickness levels out the roll and guides the fabric back to the center. If the misalignment persists, check your brackets with a spirit level; an unlevel installation is a frequent culprit for wonky rolling.
For blinds that feel sluggish or won’t stay up, you may need to adjust the spring tension. Most modern units allow you to increase tension by manually rolling the blind up halfway while it’s off the brackets, then popping it back in. This pre-tensions the internal spring for a smoother lift. Knowing when to replace roller blinds rather than spending your Saturday afternoon with pliers is the key to a stress-free home. If these DIY steps feel like too much of a chore, exploring our selection of DIY blinds is a great way to see how affordable a brand new, smooth running system can be.
Frayed edges often happen when a blind isn’t level and rubs against the bracket. You can carefully trim these with sharp fabric scissors to prevent further unravelling. However, if the fraying is widespread, it’s usually a sign that the fabric has lost its structural integrity due to UV exposure. At that stage, a repair is only a temporary patch for a larger problem.
Repair vs. Replace: Evaluating the Best Path Forward
Deciding whether to roll up your sleeves for a fix or simply start fresh is a common dilemma for many homeowners. We often see people spend hours trying to resuscitate a blind that has simply reached the end of its natural life. A helpful rule of thumb used by many industry professionals is the 50 percent rule: if a repair costs more than half the price of a brand new unit, it’s usually time to invest in a replacement. You also need to value your own time. A two-hour struggle with a finicky spring mechanism might only buy you another six months of use, whereas a new custom blind offers years of trouble-free operation.
We always suggest following the “Fabric Rule” as your primary diagnostic tool. If the fabric is showing signs of sun-rot, mould, or permanent staining, mechanical repairs are rarely worth the effort. Even if you fix the chain or the tension, the material itself will continue to degrade, eventually tearing or looking unsightly. Modern, smooth-glide systems also offer a level of performance that older, repaired hardware simply can’t match. When you consider when to replace roller blinds, think about the total environment of your room. A fresh, custom-made blind doesn’t just work better; it revitalizes the entire space with updated textures and colours.
When a DIY Repair is the Right Choice
There are plenty of scenarios where a quick fix is the smartest move. If your blind is less than three years old and has suffered a simple mishap, like a snapped control chain or a loose mounting bracket, repairing it makes perfect sense. These are minor issues that don’t reflect the overall health of the system. For those who want to keep their window treatments in top shape for as long as possible, checking out The Ultimate Guide to Blind Maintenance can provide excellent preventative tips to avoid these small failures in the first place.
When Replacement is the Smarter Investment
Sometimes, the best way to care for your home is to know when to let go. If you’re dealing with widespread fabric mould or stubborn sun stains that no amount of scrubbing can shift, a replacement is the only way to restore a healthy indoor environment. Upgrading to modern indoor roller blinds also provides a great opportunity to improve your home’s thermal insulation, keeping you cooler in summer and warmer in winter. Most importantly, if your current setup relies on old-style corded systems, switching to a cordless or tensioned design is a vital step for child safety compliance in 2026. Knowing when to replace roller blinds ensures your home remains safe, stylish, and efficient without wasting money on temporary patches.
How to Safely Remove Roller Blinds for Replacement
Once you’ve decided exactly when to replace roller blinds, the first physical step is clearing the way for your new window treatments. Removing an old, jammed, or sun-damaged blind is a straightforward task, but doing it correctly ensures you don’t damage your window reveal or architrave. Before you reach for the screwdriver, clear your windowsill of any decorative items and roll the blind fabric up completely. This keeps the unit compact and prevents the fabric from flapping around or catching on the brackets as you work. It’s much easier to manage a tight roll than a loose, dangling sheet of material.
Safe removal is all about understanding the tension and weight of the unit. We suggest having a second person nearby if you’re dealing with extra-wide windows, as the metal tube can be surprisingly heavy once it’s released from the wall. After the blind is down, take a moment to inspect the mounting surface. If you’re moving from an old-style system to modern DIY blinds, you’ll want a perfectly clean slate for your new installation. Patching old screw holes with a quality wood or plaster filler and giving the area a quick wipe down makes a world of difference for the final look.
Removing Different Bracket Styles
Most roller blinds are held in place by one of three common bracket systems. For standard spring-loaded idle ends, use the “Push and Lift” method. Simply push the blind firmly toward the spring-loaded end to compress the internal pin, then lift the opposite end out of its bracket. If you have modern designer hardware, look for small safety locking tabs. These plastic clips often need to be depressed with a flat-head screwdriver before the blind will budge. For very old installations in timber frames, you might encounter rusted or stripped screws. A drop of penetrating oil and a bit of patience will help you remove these without splintering the wood.
Preparing for Your New Measurements
A common mistake is trying to measure for new blinds while the old hardware is still in place. We always recommend removing every part of the old system first. Measuring a bare window reveal allows you to find the most accurate width and height, ensuring your new custom-made blinds fit flush against the glass without any light gaps. Once the area is clear and any surface bumps are sanded down, you can move on to the most important part of the process. Consult our guide on how to measure for blinds online to ensure your replacement order is spot on for a professional, millimetre-perfect finish.
Upgrading to Custom-Made DIY Roller Blinds
Once those old, dusty brackets are off the wall, you’ve got a fresh canvas to work with. Deciding when to replace roller blinds is the perfect moment to move away from the “one size fits most” approach of big-box retail stores. Off-the-shelf “trim-to-fit” options often end up with jagged, uneven edges that fray within months; they rarely provide the snug fit your windows deserve. Choosing a custom-made solution ensures that your new blinds look like they were built into the architecture of your home, not just stuck on as an afterthought. It’s about achieving that crisp, professional look without the high-end designer price tag.
Your window’s purpose should dictate your fabric choice. For instance, blockout roller blinds are essential for bedrooms because they eliminate streetlights and early morning sun, helping you get a better night’s rest. In your living areas, sunscreen roller blinds are a fantastic choice because they reduce glare on your TV and protect your furniture from UV damage while still letting you enjoy the backyard view. Modern hardware has come a long way since the bulky, plastic designs of the 2010s. Our current systems feature slimline profiles and smooth-glide technology that makes daily operation a breeze, providing a functional longevity that older units simply lack.
Choosing the Right Style for Your Room
Think about how light moves through your home during the day. If you have a home office where screen glare is a constant battle, light filtering roller blinds can soften the incoming sun without making the room feel like a cave. We’ve seen many homeowners transform their space just by updating their hardware to modern, sleek cassettes that hide the roll. This small change creates a minimalist, built-in aesthetic that instantly modernizes a room. It’s a simple way to add value to your property while making your daily environment more comfortable and stylish.
The Aussie Online Blinds Difference
We take great pride in being a family-owned business that understands the unique needs of Australian homes. Our direct-to-consumer model provides a significant financial advantage, as you aren’t paying for a middleman or a professional installer’s van to sit in your driveway. The simplicity of our DIY blinds process means you can achieve a professional-grade finish on your own schedule. We’ve designed our system to be approachable for everyone, regardless of their previous home improvement experience.
Every order we manufacture is built to your specific measurements, ensuring a millimetre-perfect finish that off-the-shelf products simply can’t match. We stand by our domestic production with a 3-year warranty, giving you total peace of mind that your investment will last. When you decide when to replace roller blinds, we’re here to make the transition as smooth as possible. With national Australia-wide shipping, your custom-made upgrade is only a few clicks away, ready to be delivered straight to your front door for a simple, rewarding weekend project.
Take the Next Step Toward a Brighter Home
Deciding when to replace roller blinds doesn’t have to be a guessing game. By checking for the telltale signs of sun-rot and weighing up the 50 percent rule for repair costs, you’re now equipped to make the best choice for your environment. A simple mechanical fix might buy you some time, but nothing beats the smooth operation and safety of a modern, custom-made system.
We’re passionate about helping you achieve a professional look without the designer price tag. As a proudly Australian family-owned and operated team, we’re committed to making luxury home styling accessible to everyone. Every order includes a 3-Year Warranty and easy-to-follow DIY installation guides to ensure your project is a success from start to finish.
Browse our range of custom-made Roller Blinds and get an instant quote today. You’ll love the difference a millimetre-perfect fit makes to your daily comfort and style.
Frequently Asked Questions
Can I just replace the fabric on my roller blind and keep the old hardware?
You can technically swap the fabric, but it’s rarely practical or cost-effective for a DIY project. Most roller blind tubes and fabrics are bonded with specific industrial adhesives or splines that are difficult to replicate at home without professional equipment. By the time you purchase high-quality fabric and spend hours trying to get it to roll straight on old, potentially worn hardware, you’ve often spent more than the cost of a brand new custom unit.
How long should a high-quality roller blind last in Australia?
A high-quality roller blind typically lasts between 8 and 12 years in the Australian climate. This lifespan depends heavily on sun exposure and how often you operate the mechanism. North-facing windows often see fabric degradation sooner due to intense UV rays. Regular cleaning and gentle operation help you get the most out of your investment, but knowing when to replace roller blinds is key to maintaining your home’s insulation and style.
Is it difficult to install new roller blinds myself?
Not at all. Installing new blinds is a very straightforward process that usually takes about 15 to 20 minutes per window. Our DIY models come with clear, step-by-step guides that walk you through the bracket placement and clicking the blind into place. You don’t need professional skills; just a bit of patience and a steady hand. Most of our customers find it a rewarding way to save on installation fees while achieving a perfect finish.
What tools do I need for basic roller blind repair?
You likely already have everything you need in your kitchen drawer or garage. A standard flat-head screwdriver is essential for prying off clutch covers or adjusting brackets. You’ll also want a pair of pliers for snapping chain joiners together and a spirit level to ensure everything is hanging straight. If you’re trimming frayed edges, a very sharp pair of fabric scissors is a must to prevent further unravelling of the material.
Why does my roller blind keep falling out of the bracket?
This usually happens because the mounting brackets have worked loose or weren’t installed level to begin with. If the brackets are even a few millimetres off, the vibration from pulling the chain can cause the pin-end to slip out of its housing. Check that your screws are tight and the brackets are perfectly horizontal. If the metal brackets have bent over time, it’s a sign that the structural integrity is failing and you should consider an upgrade.
Can I fix a roller blind that won’t stay up?
Yes, this is often a simple fix involving the internal spring tension. You can usually resolve this by removing the blind and manually rolling it up halfway before clicking it back into the brackets. This “pre-tensions” the mechanism for a smoother lift. However, if the internal plastic gears in the clutch have worn down, the blind will continue to slip. In those cases, replacing the clutch unit or the entire blind is the most reliable long-term solution.
Are modern roller blinds safer for children than older models?
Modern blinds are significantly safer because they must comply with strict 2024 and 2026 safety standards. These regulations require either cordless operation or inaccessible cords to prevent strangulation hazards. Older models often feature dangerous dangling loops that are no longer legal for sale. Upgrading to a modern system isn’t just about aesthetics; it’s a vital step in making your home a safer environment for kids and pets.
How do I know if my blind fabric has sun-rot?
Look for “chalking” on the back of the fabric, which looks like a fine white powder rubbing off the blockout coating. You can also test the edges; if the material feels crunchy or snaps when you gently bend it, the UV rays have broken down the fibres. Brittle fabric is a clear signal of sun-rot. Once this happens, the blind is a tearing hazard and it’s definitely time to look at when to replace roller blinds to restore your window’s appearance.